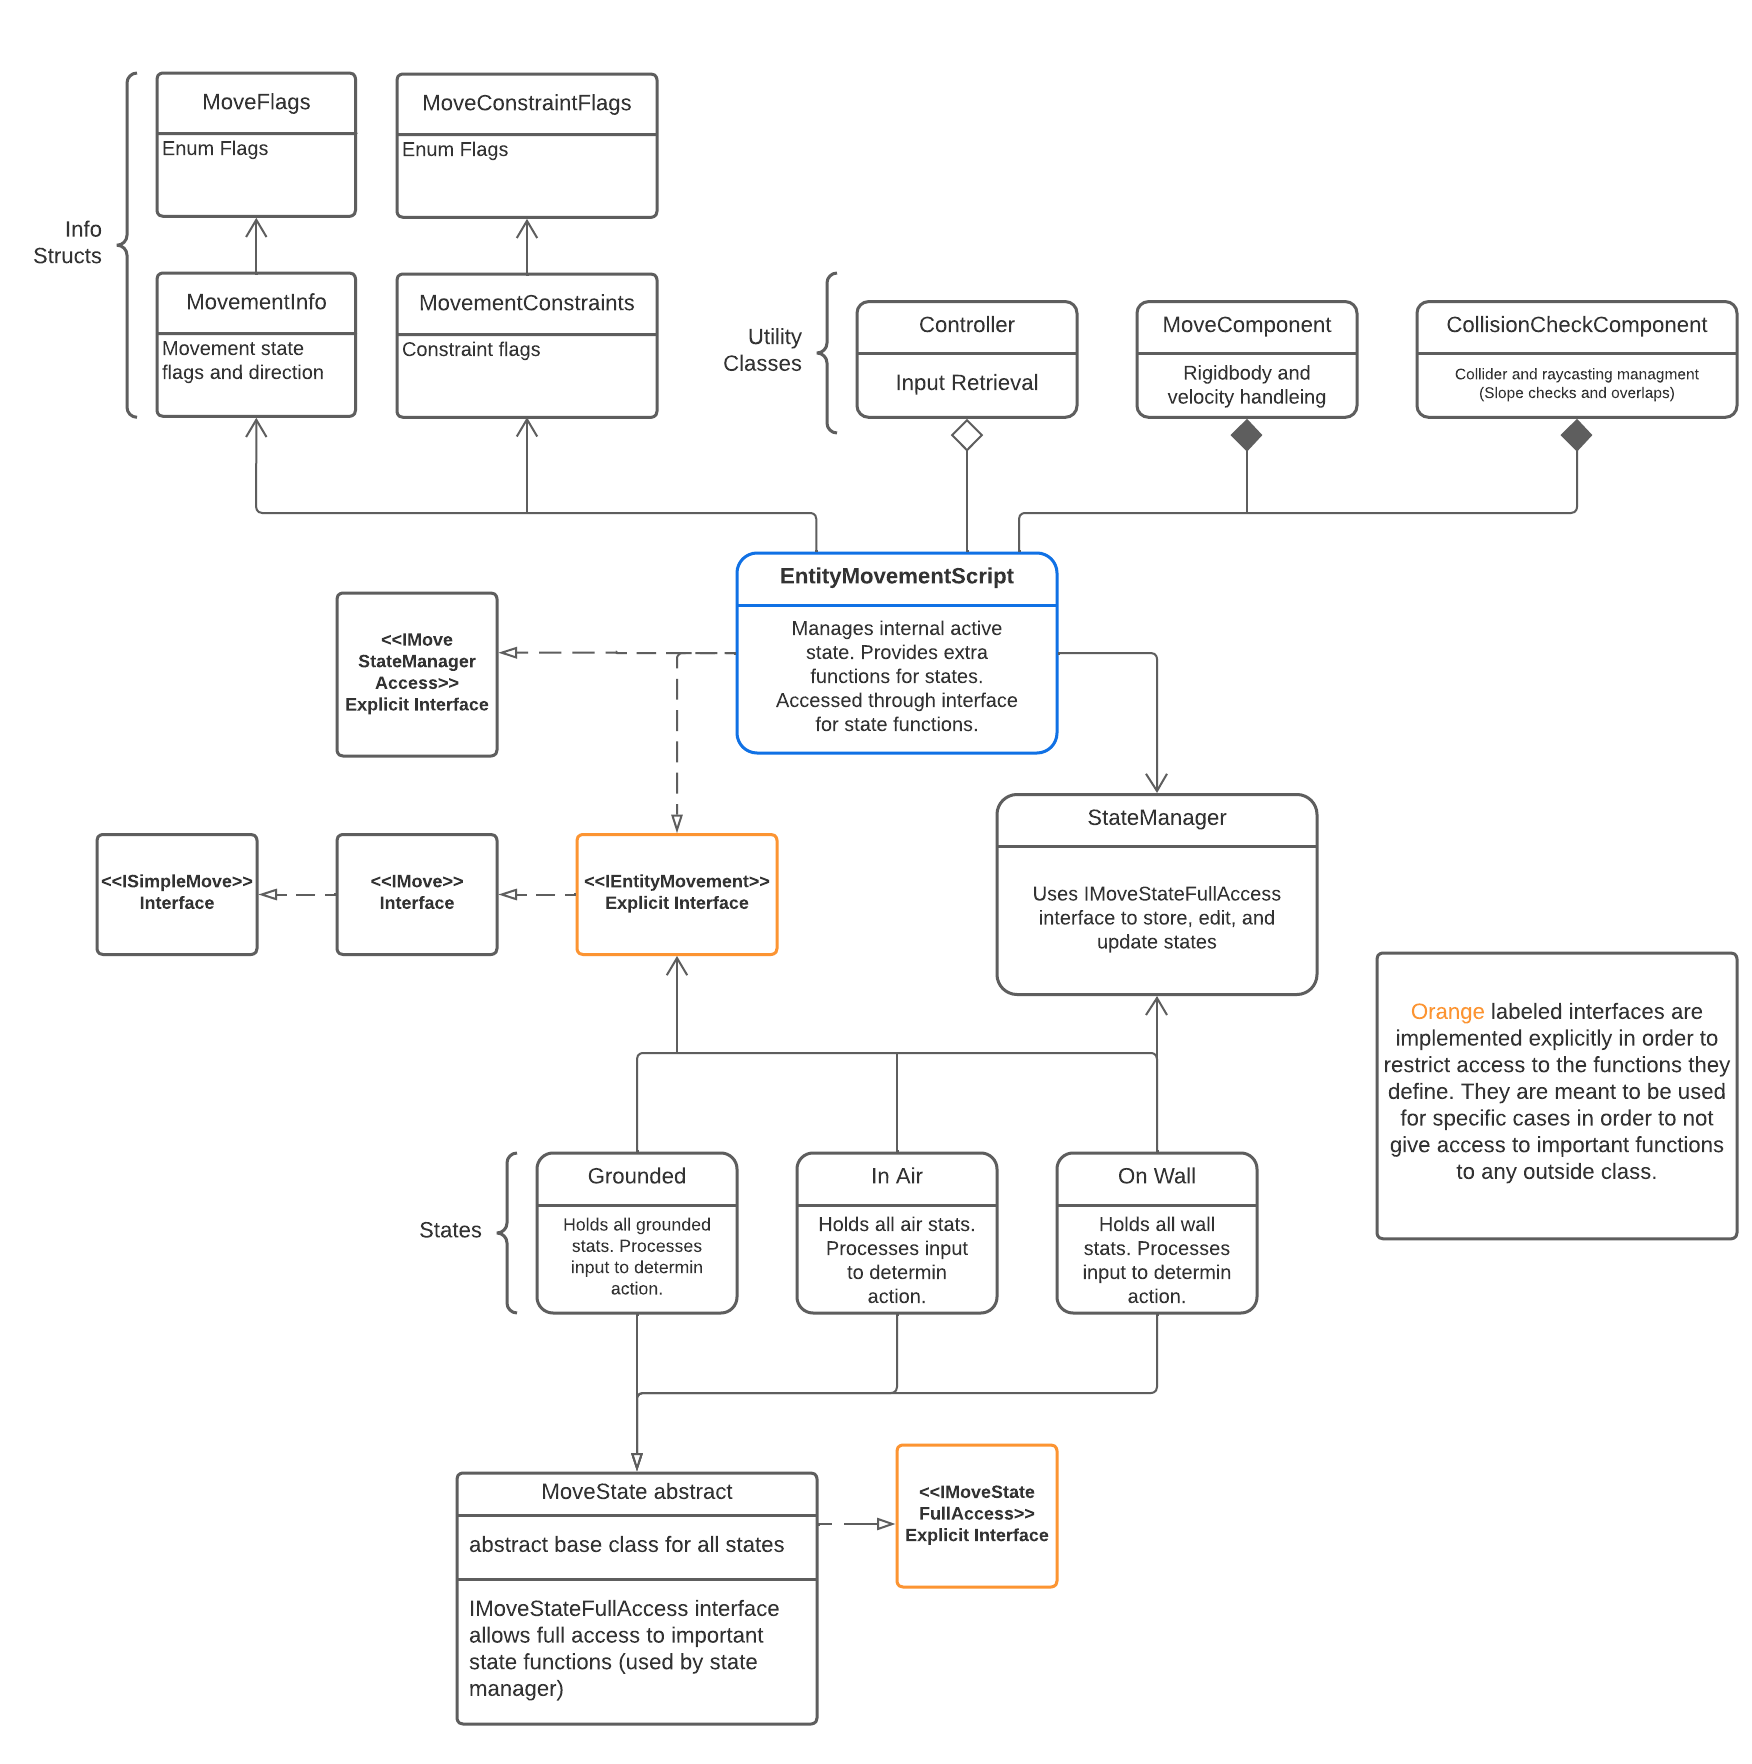
EntityMovementScript
This script acts as the main container and driver of the movement systems.
This class initializes the states specified for use from the AddStates variable, then adds them to a state manager.
- Determines the active state of entity using a ground check and wall check
- Implements interfaces to allow external interactions with entity such as adding force or getting the entity's movement info.
- Implements interface to allow states to make changes to entity while having data persist across multiple states such as jump count and collider size changes.
This is done through IEntityMovement and should Not be used by anything other than a state for data stability reasons as changes can be critical.
- Draws many debug visuals such as ground check area, wall check ray, and others.
State Manager
This class is a container of states and is to be used by another class.
This class contains methods to manage the active state out of a collection of multiple states.
States are updated within this class using the IMoveStateFullAccess interface.
ISimple Move
This is used as a base interface for anything that will move and contains functions for getting and setting the velocity of an object as well as adding force.
Think of this as being the interface to interact with a moveable ball.
The ball is just a ball and not controlled by a player. This interface can be added and implemented as a way for the player to hit the ball and add force to it by searching for this interface on the object.
IMove
Inherits ISimpleMove interface.
Acts as a way to access the movement info of an object. This interface is meant to be used on objects that will have MovementInfo and MovementConstraints.
Within EntityMovementScript this interface provides a way to access such classes.
IEntity Movement
Inherits IMove interface.
Intended to only be explicitly implemented making it so that functions can not be accessed through a reference
to the object but rather accessed through the interface itself.
This is done to maintain security of the functions as they are only meant to be used by states held within EntityMovementScript's StateManager.
GetTransformRef() is a function within the IEntityMovement interface. Accessing this function is done like so:
EntityMovementScript player;
IEntityMovement entityInterface = player;
Transform transform = entityInterface.GetTransformRef();
EntityMovementScript explicitly implements IEntityMovement. Access to the functions is done through the interface.
Attempting to use GetTransformRef() or any other functions of IEntityMovement through player will not work.
The base MoveState already stores a reference to this interface of its parent in the variable m_parentInterface.
Use this when adding a new state or adjusting a preexisting one.
IMove StateManager Access
Allows limited access to an object's StateManager.
Specifically this interface allows other objects to get access to the MoveState of an object that implements this interface.
This interface is used as a way to access and change the stats of EntityMovementScript's states.
Below is an example of how to make a trigger that will set the player's run speed to 20.
(A similar script example can be found in the Entity Controller pack called ChangePlayerStatsTrigger within the Scripts folder.)
void OnTriggerEnter2D(Collider2D col)
{
if (col.gameObject.GetComponent<IMoveStateManagerAccess>() != null)
{
IMoveStateManagerAccess moveStateManager = col.gameObject.GetComponent<IMoveStateManagerAccess>();
GroundedState groundedState = moveStateManager.GetState("GroundedState") as GroundedState;
if (groundedState != null)
{
groundedState.m_stats.runSpeed = 20f;
}
}
}
IMoveState FullAccess
Like IEntityMovement this is an explicitly implemented interface.
This interface is explicitly implemented on all concrete MoveStates (OnWall, GroundedState, …).
It is required that this interface be explicitly implemented on any new states added for the state to be used properly in StateManager.
The interface is designed to only be used by StateManager.
The interface allows StateManager to access important functions within states in order to update them and transition states while making it so
that an outside class can not accidentally call these functions on a state when gaining access to them through IMoveStateManagerAccess.
MoveFlags
An enum in which each value is a flag allowing multiple values to be true or false at a time.
Microsoft flags documentation.
These flags are used to describe the state of a moving entity such as if an entity is grounded and crouching.
They are contained in the MovementInfo class These flags can be seen in the inspector during play if LogFlags is checked in the
EntityMovementScript or if the Inspector is in Debug mode and the MoveInfo dropdown is expanded.
This class is largely used within each state, specifically the HandleInput functions.
An example of use outside of EntityMovementScript can be seen in the PlayerAnimationScript as the script obtains the flags through MovementInfo and checks the flags to determine which animation to play.
MoveConstraintFlags
An enum in which each value is a flag allowing multiple values to be true or false at a time.
Microsoft flags documentation.
This set of flags is used within MoveStates to constrain or prevent a type of movement such as running or jumping and are contained in the MovementConstraints struct.
It is up to the state to implement and check these flags
MovementConstraints
This struct contains MoveConstraintFlags and provides various bitwise functions to set and check the flags.
MovementInfo
This class contains MoveStateFlags and provides various bitwise functions to set and check the flags.
It also contains a few extra variables to further describe the state of an entity such as direction it is facing and directional input axis to describe movement direction.
This class is largely used within each state, specifically the HandleInput functions.
An example of use outside of EntityMovementScript can be seen in the PlayerAnimationScript as the script obtains the flags through MovementInfo and checks the flags to determine which animation to play.
Controller
Abstract MonoBehaviour class used within states to retrieve input data.
On Awake EntityMovementScript finds the controller on the entity and passes it to each state as it initializes them.
The states use the controller within the HandleInput function to read inputs and take action based on inputs and constraints.
Controllers can be found in the MonoBehaviors folder. A player controller and a simple AI controller can be found there.
PlayerControllerScript is a script that utilizes the InputContainer class to read inputs and store the data
(type of input, if it is held down, if it is currently down, if it is new this frame, and if it is locked) within the container.
The inputs are set through a scriptable object, ScriptableInputMap, that maps inputs to actions which are enum values that dictate how the input will be used elsewhere.
Note that the PlayerControllerScript is the implementation of Unity's old input system and will not be used if the new system is being used.
Instead InputHelperClass will be used if an entity is to be controlled by PlayerInput.
InputHelperClass
This class is used by states when a controller is not set and EntityMovementScript has detected a PlayerInput component (a component defined by Unity's new input system) on the entity.
Unity documentation for input system.
InputHelperClass utilizes the action map to read inputs and allows states to read the data of actions in their HandleInputWithInputHelper functions letting them use the new input system as a way to receive input.
This class also includes a function helpful for debugging that reads out the input and its state in the Inspector of EntityMovementScript in the Input Action Display text area during play.
This class is important for the use of the new input system paired with a state machine. By having the InputActionMap stored externally from the states and directly reading the inputs within the state this allows inputs to persist across state changes.
MoveComponent
This class contains simple functions for simple movement of a rigid body such as setting velocity,
adding force, smoothly setting velocity with Vector3.SmoothDamp, as well as drawing a debug line that shows velocity.
CollisionCheckComponent
(“Ground” in this context is any Collider within specified layers to check. EX. a collider in a collision layer labeled “ground”)
Class in charge of various collision checks and data storing. Utilizes a mix of raycasts and overlap shapes for area checks.
Allows an object to obtain slope info about the ground below it, if it is on the ground, if there is ground above it, if the object is on a ledge, the RaycastHit2D information of the SlopeCheck rays, as well as other information useful for 2d movement.
This class also allows for the ability to ignore collision with specific objects and undoing the ignoring of said objects to allow for an object to pass through others under desired circumstances.
The class uses three rays for slope checking and three points for area checks (head, middle, feet).
There are also debug options that will draw these rays and the ground normal for error checking.
MoveState Abstract
The abstract class of states that are stored and managed by StateManager within EntityMovementScript.
EntityMovementScript uses StateManager to set the active state but EntityMovementScript holds the logic to change states based on movement info.
A state dictates the actions available to an entity in that moment based on input and movement info.
States manipulate the position and movement info of an entity based on input, received from either a Controller or InputHelperClass,
the entity's movement restrictions, and the current movement info (an entity can not run if it is not grounded).
States utilize an entity's MoveComponent as well as its CollisionCheckComponent to move the entity.
A reference to the entity's EntityMovementScript through its IEntityMovement interface for extra functions that aid in moving the entity while having data persist across states.
Concrete States Must explicitly implement the IMoveStateFullAccess in order for StateManager to update them correctly.
Concrete states also implement their own stats classes since this data will be unique per type of state. The same goes for events contained within the states.
States include a name variable at base level that should be set to the actual name of the state class.
This makes it clear which state is retrieved when checking an entity's state externally and wanting to change the state's stats since casting will be needed from the base class.
See IMoveStateManagerAccess for an example of using a states name or ChangePlayerStatsTrigger within the project.
Name is used to retrieve the base of a specified class then cast to its actual concrete form.
Grounded
This state is in charge of all actions an entity can take while on the “ground”, a collider in a specified layer.
This state used a number of variables to allow an entity to walk, run, dash, crouch, slide, and even jump
(This jump however is only responsible for the first jump to get the entity off the ground.
Following jumps will be handled by InAir state). All this while on a ground collider of any angle as long as the angle of the ground is less than the specified walkable slope.
A slope too steep will cause the entity to slide off.
Primary movement is done through manipulation of an entity's friction, gravity, and velocity.
In Air
This state is in charge of all actions an entity can take while not grounded such as aerial movement,
jumping, ascending and descending speeds, and dashing in the air.
On Wall
This state is in charge of all actions an entity can take while not grounded and near a wall such as sliding down a wall, wall jumps of various kinds, wall climbing, and wall grabbing.